Eyeshadow blending can seem tricky for beginners. It’s an essential skill for flawless makeup.
Want to create stunning eye looks? Learning the right blending techniques is key. Blending eyeshadow makes colors transition smoothly. It helps create depth and dimension. This skill can elevate any makeup look from simple to fabulous. Beginners often struggle with where to start.
But don’t worry! With practice, anyone can master it. This guide will introduce you to basic blending techniques. You’ll learn how to use brushes effectively. Discover the secrets to seamless color transitions. Soon, you’ll feel confident in creating beautiful eye looks. Let’s dive in and explore these essential techniques. Your journey to perfect eyeshadow starts here.
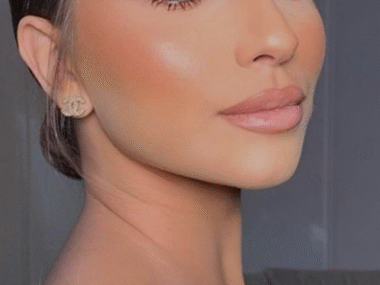
Credit: www.tiktok.com
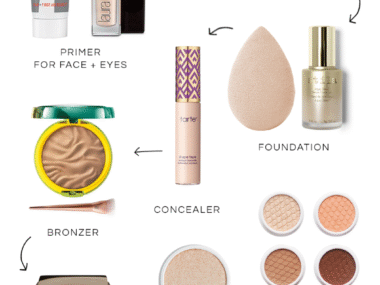
Choosing The Right Tools
Choosing the right tools is crucial for perfect eyeshadow blending. Beginners often struggle with creating a seamless look. The right tools can make this process easier and more enjoyable. A well-selected brush or sponge can transform your makeup routine. Investing in quality tools ensures a smooth application. This section explores essential brushes and the difference between sponges and brushes.
Essential Brushes
Brushes come in various shapes and sizes. Each type serves a unique purpose. A fluffy brush is ideal for blending colors softly. It helps in creating a diffused look. Flat brushes work well for packing color on the lid. They offer precision and control. Smaller brushes are great for detail work. They help in defining the crease or lash line. Quality brushes often have soft bristles. This ensures a gentle application on the skin.
Sponges Vs. Brushes
Sponges offer a different texture. They create a smooth and even finish. Brushes provide control and precision. Sponges can be easier for beginners. They help in achieving a natural look. Brushes are versatile and offer more options. Each tool has its strengths and weaknesses. Choosing between them depends on your preference. Many makeup artists recommend using both. This gives the best results for different eyeshadow looks.
Prepping Your Eyes
Start with clean eyelids to ensure smooth application. Use a primer for lasting color and easier blending. Begin with light shades, applying them in circular motions to avoid harsh lines. Gradually layer darker shades, blending seamlessly for a natural look.
Finish with a soft brush to refine the edges.
Prepping your eyes is the crucial first step in achieving flawless eyeshadow blending. Without a good base, even the best eyeshadow techniques can fall flat. Let’s explore some simple steps to ensure your eyelids are ready for eyeshadow application.
Clean Canvas
Start with a fresh, clean canvas. This means making sure your eyelids are free from oil, dirt, and leftover makeup. Use a gentle cleanser or makeup remover to clean your eyelids thoroughly.
Pat them dry with a soft towel. Avoid tugging at your skin to prevent irritation. A clean surface helps the eyeshadow stick better and last longer.
Primer Application
Consider primer as the foundation of your eyeshadow look. A good primer smooths the eyelid and evens out any discoloration. It also helps the eyeshadow adhere better and prevents creasing.
Use your finger or a small brush to apply a thin layer of primer over your eyelid. Focus on the area where you plan to apply eyeshadow. Let it dry for a few seconds before moving on to your eyeshadow.
Have you ever noticed your eyeshadow fading or creasing by midday? Primer could be your secret weapon. It creates a perfect base, making your eyeshadow more vibrant and long-lasting. Give it a try and see the difference for yourself.
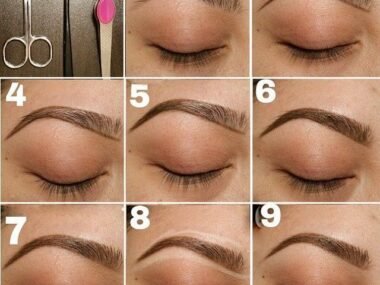
Understanding Eyeshadow Types
Understanding eyeshadow types is key for mastering blending techniques. Different eyeshadow types can dramatically affect your look and application process. Knowing the characteristics of each type helps you choose the best one for your desired effect.
Powder Vs. Cream
Powder eyeshadows are popular for their versatility and ease of use. They’re great for creating soft, blended looks and are perfect for beginners. You can find them in a variety of finishes, from matte to shimmer.
Cream eyeshadows, on the other hand, offer intense pigmentation and a smooth application. They are ideal for creating bold, dramatic looks. However, they can be trickier to blend, so practice is key. A tip is to use a synthetic brush for better control and precision.
Both types have their perks. Powder is forgiving and easy to layer, while cream gives a rich color payoff. Which do you prefer? Consider your comfort level and the occasion.
Matte Vs. Shimmer
Matte eyeshadows are perfect for subtle, everyday looks. They provide a smooth base and are great for contouring and defining your eyes. If you’re aiming for a natural or professional appearance, matte is your go-to.
Shimmer eyeshadows bring sparkle and dimension to your eyes. They’re perfect for evenings and special occasions. Remember, a little shimmer goes a long way, so apply sparingly to avoid overpowering your look.
Mixing matte and shimmer can create a balanced look. Use matte for base and crease, and add shimmer on the lids for a pop. How do you balance your eyeshadow? Experimenting with textures can reveal what suits you best.
Understanding these types can transform your makeup game. Whether you’re just starting or refining your skills, choosing the right eyeshadow can make blending easier and more effective. Are you ready to explore and find your perfect match?

Credit: www.youtube.com
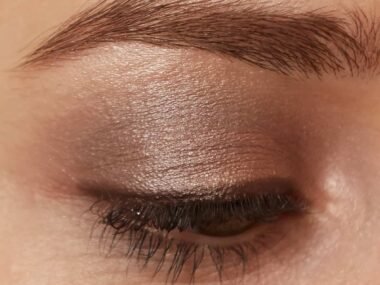
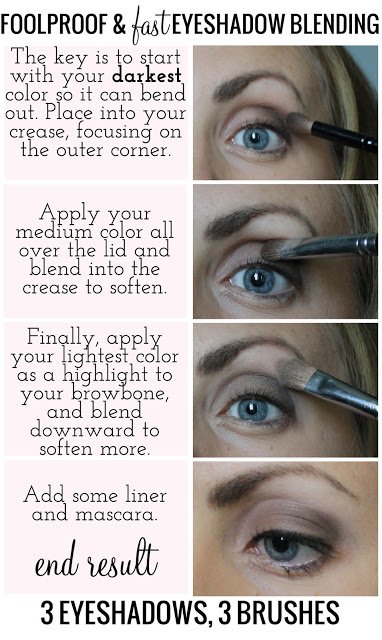
Basic Blending Techniques
Learning eyeshadow blending is essential for beginners. It makes makeup look smooth and professional. Blending can turn simple eyeshadow into stunning looks. Basic techniques help achieve this effortlessly. These methods are easy to learn and perfect for anyone new to makeup.
Windshield Wiper Motion
This technique is simple and effective. Use a fluffy brush to blend eyeshadow across the eyelid. Move the brush back and forth like a windshield wiper. This motion softens harsh lines and creates a seamless transition. Start with light pressure for a natural look.
Build the color gradually for more depth. This technique is perfect for creating a soft, blended effect. It works well with neutral and bold shades. Practice makes perfect.
Circular Buffing
Circular buffing is another great blending technique. Use a small, rounded brush for this method. Apply eyeshadow in circular motions to blend colors. This helps achieve a smooth and even finish. Focus on the edges to create a soft gradient.
Start with small circles and increase the size for better blending. This technique is ideal for smokey eyes. Circular buffing adds dimension and depth to your look. It is beginner-friendly and easy to master.
Layering Colors Effectively
Mastering eyeshadow blending starts with layering colors effectively. Begin with neutral shades as your base. Add depth using darker tones in the crease, and highlight with lighter shades near the brow bone.
Layering colors effectively in eyeshadow application can transform your look from basic to breathtaking. It’s an art that even beginners can master with the right techniques. By carefully choosing and blending shades, you can add depth and dimension to your eyes.
###
Transition Shades
The magic of a flawless eyeshadow look often starts with transition shades. These are typically neutral colors that are slightly darker than your skin tone. They act as a base, making it easier to blend darker and bolder colors seamlessly.
Think of the transition shade as the foundation of your eye makeup. It helps to prevent harsh lines and creates a gradient effect on your eyelid. Try using a fluffy brush to apply this shade to your crease, moving back and forth like a windshield wiper.
Have you ever wondered why some eyeshadow looks seem so effortlessly blended? The secret often lies in the transition shade. It bridges the gap between your skin and the eyeshadow, making everything look cohesive.
###
Building Intensity
Once your transition shade is set, it’s time to build intensity. Start with lighter shades and gradually add darker colors. This layering technique ensures that each color stands out while still blending beautifully.
Use a smaller, denser brush to pack color onto the lid. Begin with a medium shade, applying it closer to the lash line. Then, gently build up to darker shades, focusing on the outer corner of your eye for a more dramatic effect.
Are you afraid of overdoing it? Remember, you can always add more color, but removing it can be challenging. Take your time and build slowly to achieve a balanced look.
Layering colors effectively is about patience and practice. As you try different combinations, you’ll discover what enhances your natural beauty. Don’t be afraid to experiment and express yourself through the art of eyeshadow.
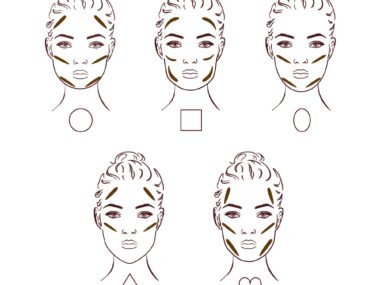
Creating Depth And Dimension
Enhancing eyeshadow depth involves smooth blending for beginners. Start with a light base, gradually adding darker tones. This technique creates a seamless transition, making eyes appear more defined and vibrant. Practice using gentle, circular motions with a soft brush for best results.
Creating depth and dimension in eyeshadow application brings life to your eyes. It’s all about using light and dark shades to add contrast. This technique enhances your eye shape and makes them stand out. Beginners can easily learn these techniques with a little practice.
Highlighting The Brow Bone
Highlighting the brow bone is an essential step. It brightens your eyes and lifts the brow area. Use a light, shimmery shade for this purpose. Apply the highlighter just below the eyebrow arch. This draws attention to the eyes. Blend it well for a seamless look. Avoid harsh lines by using a soft brush. This creates a natural and polished effect.
Darkening The Outer V
Darkening the outer V adds depth to your eyes. Use a dark shade like brown or gray. Apply it in a V shape at the outer corner of the eye. This should extend slightly into the crease. The outer V creates a shadow effect. Blend thoroughly to avoid harsh edges. Use a small, dense brush for precision. This technique adds drama and dimension to any look.
Common Mistakes To Avoid
Beginners often apply too much eyeshadow, resulting in harsh lines. Blending with a clean brush can soften the look. Avoid rushing; take your time to build layers gradually for a seamless finish.
Learning how to blend eyeshadow can feel like a daunting task, especially if you’re just starting out. But don’t worry, you’re not alone. Many beginners make common mistakes that can easily be avoided with a little guidance. Recognizing these missteps can save you time and help you achieve a flawless look. Let’s dive into some of these common pitfalls and how you can steer clear of them.
Overblending
One of the most frequent mistakes is overblending. It’s easy to get carried away, especially if you’re trying to perfect your look. But blending too much can muddy your colors, making them lose their vibrancy.
Think of it like mixing paint; too much blending and you end up with a single, dull shade. Instead, aim for a soft gradient. Use gentle, circular motions with a light hand. Remember, it’s easier to add more color than to take it away.
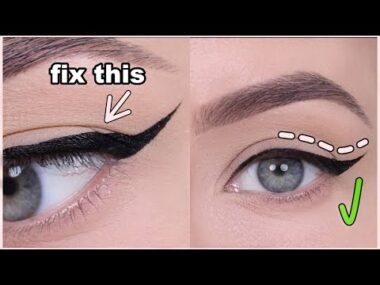
Harsh Lines
On the flip side, harsh lines can be just as problematic. They can make your eyeshadow look unpolished and abrupt. This often happens when you’re too heavy-handed or using the wrong brush.
I once attended a wedding with a friend who had a stark line of blue eyeshadow. She didn’t realize it until she saw photos later. To avoid this, use a clean blending brush to soften the edges. A windshield wiper motion can help diffuse the color without overdoing it.
Are you guilty of these mistakes? With practice, you can refine your technique and create beautiful, seamless looks. What new technique will you try next time?
Tips For Long-lasting Wear
Mastering eyeshadow blending creates vibrant looks. Start with light colors; build depth using darker shades. Use soft brushes for seamless transitions. Ensure shadows last longer by applying primer first. Blend gently for a natural finish.
Creating a flawless eyeshadow look that lasts all day can be a challenge, but with the right techniques, it’s entirely achievable. As a beginner, you might find your eyeshadow fading or creasing by midday, which can be frustrating. Here are some practical tips to ensure your eyeshadow stays vibrant and fresh, from the morning rush to the evening unwind.
###
Setting With Powder
To lock in your eyeshadow, setting with powder is essential. After applying your eyeshadow, lightly dust a translucent setting powder over your lids. This step helps absorb any excess oils that could cause your eyeshadow to crease or fade.
I remember the first time I tried this technique; I was amazed at how my eyeshadow stayed put through a long day at work. It felt like discovering a secret weapon in my makeup arsenal.
Do you have a favorite translucent powder? Try experimenting with different brands to see which one works best for you. You might be surprised at how much of a difference the right powder can make.
###
Using Setting Spray
A good setting spray can be a game-changer for eyeshadow longevity. After completing your entire makeup look, spritz a setting spray over your face, focusing on the eye area. This creates a protective barrier that keeps your eyeshadow vibrant and in place.
I once forgot to use setting spray before heading out to a summer event. By the end of the day, my eyeshadow had practically disappeared. That experience taught me the importance of this step, especially in warmer weather.
Consider trying a setting spray with a matte finish if you have oily skin, or a hydrating one if your skin is dry. Have you tried using a setting spray before? If not, it might just become your new favorite step in your makeup routine.
These techniques might seem simple, but they’re effective. They can make all the difference in how your eyeshadow performs throughout the day. Give them a try and see how they transform your makeup routine!

Credit: www.pinterest.com
Frequently Asked Questions
How To Blend Eyeshadow Step By Step For Beginners?
Start with a primer on eyelids for a smooth base. Apply a transition shade in the crease. Use a darker shade on the outer corner. Blend with a clean brush for seamless edges. Finish with a lighter shade on the brow bone and inner corner for highlight.
How Should A 50 Year Old Apply Eyeshadow?
Choose neutral shades for a natural look. Apply primer to prevent creasing. Blend lighter colors on the lid. Use darker shades on the outer corners for depth. Finish with a soft eyeliner and mascara.
Should A 60 Year Old Woman Wear Eyeshadow?
A 60-year-old woman can definitely wear eyeshadow. It can enhance her eyes and boost confidence. Opt for neutral shades that complement her skin tone. Cream-based eyeshadows provide smoother application. Experimenting with colors can be fun and expressive. Personal style and comfort should guide the choice.
How To Apply Eyeshadow For Beginners Step By Step?
Start with a clean eyelid. Apply primer to enhance shadow longevity. Use a base shade across the lid. Blend a darker shade into the crease. Highlight the brow bone with a lighter color. Finish with eyeliner and mascara for definition.
Conclusion
Blending eyeshadow can seem tricky at first. Practice makes it easier. Start with simple techniques. Use soft brushes for a smooth finish. Choose colors that complement each other. Work in small circles for an even look. Always clean your brushes after use.
This keeps colors true. Experiment with different textures and shades. Build your confidence gradually. Remember, makeup is about fun and expression. Don’t stress over perfection. Enjoy the creative process. Let your eyeshadow tell your story. With these tips, you’re ready to try new looks.
Happy blending!